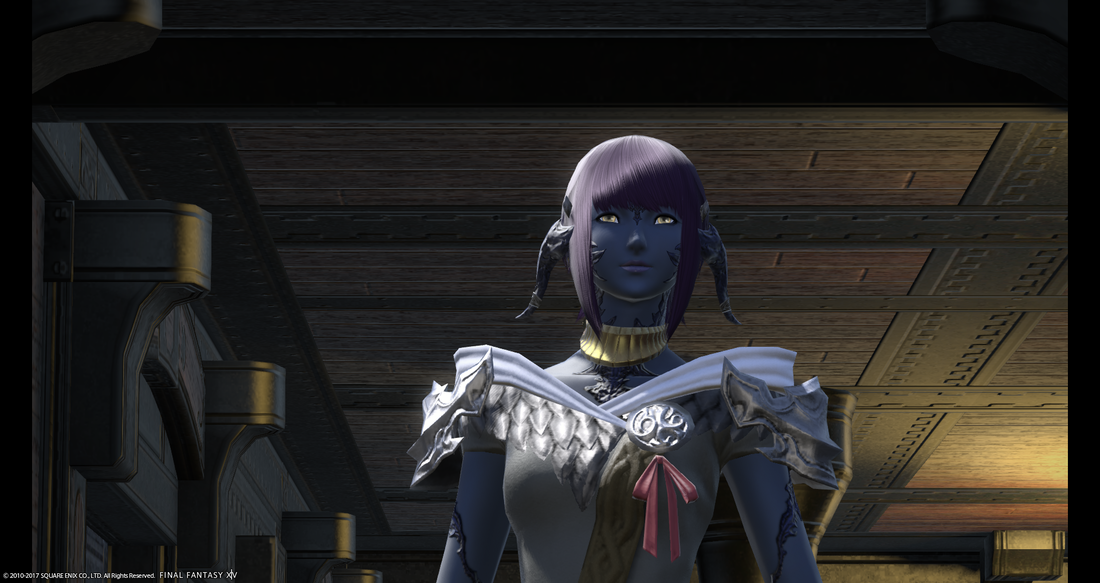
 I'm back, and ready to play my totally-not-dragon new player race! I have to say, I absolutely love the fact that you can choose offbeat skin tones with the new race. Nothing makes me happier than a blue skinned not-dragon with black scales, horn, and tail.
Now, I haven't gone and forgotten about my lovely little Lalafell summoner. However, it's been so long since I've played her that I have absolutely no idea what I'm trying to do anymore! The current plan of action is to play my lovely new not-dragonkin until I've relearned the commands and controls of the game, and then swap back over to my level 50 summoner so I can play through Heavensward and the latest expansion, Stormblood. Very excited to play through both and level up my adorable little Lalafell. I do plan on streaming/recording my journey with my new Au Ra though, so stay tuned for it. The first installment should be coming later this week. I definitely did forget that it's not voiced at all, so prepare yourself for funny voices and terrible accents. Happy Friday!
0 Comments
I moved to a new continent early in 2014, and the lag has made healing and dodging just about impossible. As a result, I will not be playing Final Fantasy XIV: A Realm Reborn actively until I am able to return to the land with no lag.
Good luck, players! INTRODUCTIONBLAH BLAH BLAH... Well, this is my second time typing this, so it may not be quite as entertaining as the original post. That's what I get for attempting to use the Weebly app. The Thornmarch fight is an extremely simple fight, providing the people in your party understand their roles and how to play them. The mechanics are quite simple, and I will highlight all the spells that may result in your party wiping due to lack of diligence on a person's part. THE FIGHT BEGINS - Phase 1 This phase centers on a few things. First, the tanks really need to know what they are doing. This isn't some 4-man dungeon they can breeze though if they have enough gear. The tanks need to be know the spawn order of the moogles, along with their respective abilities, as well as which ones have a threat/hate meter. If you have derpy dps, then it is up to either the tanks or the healers to mark the targets in the proper order to kill. The tanks playing an active role becomes even more crucial when you wind up with no melee dps for interrupts/stuns. Healers need to know when to heal and when not to. This means that healers also need to know the spawn order, in a general sense, and understand how much threat/hate their respective healing spells generate. Throw a few Medica II's in the air at the start of Phase 2, and it is game over for your party. Finally, the DPS need to know the kill order for the moogles. It makes the fight much easier if they simply know which moogles to kill, but if they don't, marked targets are the way to go. The targets remain marked through the end of phase 1 into phase 2, so the moogles only need to be marked once. Moogles will pop up as a function of time. At the start, only Whiskerwall Kupdi Koop (Paladin) is on the Battlefield. 20 seconds after engaging, Woolywart Kupqi Kogi (archer) and Pukna Pako the Pomburner (Black Mage) enter. 30 seconds more and Furryfoot Kupli Kipp (White Mage), Pukna Pako the Tailturner (Thief) and Ruffletuft Kupta Kapa (Marauder) join. 40 seconds later, Puksi Piko the Shaggysong (Bard) pops in. Once the seven have popped, you have roughly 60 seconds before all seven respawn and group together to summon the King. THE FIGHT CONTINUES - Phase 2 Now the encounter becomes healer-centric, with the tanks needing to maintain threat and knowing the proper movement for the fight. Healers tend to die here, for a few reasons:
Tanks need to cooperate with the placement of the two groups, one group being King Moggle Mog the XIIth, and the other group being Whiskerwall and Ruffletuft. The King needs to be moved out of certain spells, and the tank kiting him needs to be aware of this, and properly mobile. The tank kiting the other two moogles needs to stay on the opposite side of the arena from King Moogle Mog, as well as ensuring that the moogles are faced towards the outside, so their AoE abilities do not hit the rest of the party.+ THE MOOGLES (introduced by spawn order)**a suggested kill order will be presented near the bottom of the page after the moogles have all been introduced Whiskerwall Kupdi Koop Paladin Whiskerwall is the first moogle you will encounter, and starts of the Thornmarch engagement. As he is a paladin, he is quite beefy and will not go down without some effort. He is one of two moogles that actually has a solid threat/hate meter, and must be tanked by your off-tank. His abilities vary between phases. Generally, he is marked as either #3 or #4 on the kill order. He will generally just smack the person with the highest threat/hate (preferably a tank) around until Whiskerwall is killed, with two weak, single-target attacks and one short-ranged AoE melee attack. Make sure to finish him off before switching targets. Phase I attacks: Mogdive - weak, single-target Mogbash - weak, single-target, steals weaponskillsSpinning Mogshield - a circular AoE attack around him. Phase II attacks: Phase One abilities + Charm - Charms 2-3 targets, causing them to turn on their allies and use melee attacks. The players who are charmed can still be hit by AoE abilities the other moogles create. ~~~~~~~~~~~~~~~~~~~~~~~~~~~~~~~~~~~~~~~~~~~~~~~~~~~~~~~~~~~~~~~~~~~~~~~~~~~~~~~~~~~ Pukla Puki the Pomburner Black Mage Floats around. DPS quickly. Doesn't really seem to respond to threat/hate. Very easy to kill as Pukla Puki has minimal movement and minimal defenses. Phase I/II attacks: Pom Flare* - Extremely high ranged AoE spell that needs to be stunned or silenced. High damage. *King Moggle Mog XII gets Meteor during Phase II after Pukla Puki has died, and this spell needs to be avoided by moving out of the radius. ~~~~~~~~~~~~~~~~~~~~~~~~~~~~~~~~~~~~~~~~~~~~~~~~~~~~~~~~~~~~~~~~~~~~~~~~~~~~~~~~~~~ Woolywart Kupqu Kogi Archer Sits in a corner of the battlefield randomly targeting a player. Doesn't move from his position, ever. Doesn't respond to threat/hate. Pretty easy to kill, unless you need to dodge AoE circles, relatively squishy. Phase I/II attacks: Eagle Eye Shot - Marks a player with a large, floating crosshair above their heads. After a short delay, Woolywart will shoot five ranged arrows that may deal considerable damage to the targeted player. ~~~~~~~~~~~~~~~~~~~~~~~~~~~~~~~~~~~~~~~~~~~~~~~~~~~~~~~~~~~~~~~~~~~~~~~~~~~~~~~~~~~ Furryfoot Kupli Kipp White Mage Quite squishy, is easy to take down. Casts holy and cures moogles. Doesn't respond to threat/hate. Phase I/II attacks: Holy* - Single-target spell Cure IV - Cures moogles/King for approximately 2000 HP. *King Moggle Mog XII gets holy after Furryfoot dies. Pukna Pako the Tailturner Thief Randomly targets a player, then runs up and stabs them. Doesn't respond to threat/hate. ~~~~~~~~~~~~~~~~~~~~~~~~~~~~~~~~~~~~~~~~~~~~~~~~~~~~~~~~~~~~~~~~~~~~~~~~~~~~~~~~~~~ Ruffletuft Kupta Kapa Marauder Ruffletuft is the second tank in the encounter, and it takes quite awhile to take him down. As a result, he is generally saved for last. He is the second moogle that needs to be tanked, otherwise he will kill a healer/clothy in very few hits. His initial AoE does not do too much damage, but it can stun so be careful not to stand in it. Once he dies in Phase II, the King gets both his abilities and it seems like he mashes them together. The ability the King uses is called Moogle-Go-Round, and is a gigantic AoE run, black with a green outline, and players must get out of it or they will take very high damage/die. Phase I/II attacks: Moogle-Go-Round - Short-range AoE melee attack, can stun, moderate damage Steel Cyclone - Large AoE melee attack, high damage. ~~~~~~~~~~~~~~~~~~~~~~~~~~~~~~~~~~~~~~~~~~~~~~~~~~~~~~~~~~~~~~~~~~~~~~~~~~~~~~~~~~~ Puksi Piko the Shaggysong Bard Has an attack bonus song to other moogles and a damage song that does aoe around him. Somewhat responsive to hate. Phase I/II attacks: Attack Song - Creates an AoE around Puksi Piko, giving attack bonuses to all moogles within it. Maximoogle* - Single cast on a moogle that increases its size and make it immune to all attacks. The moogle will then move slowly towards the player with highest Bard hate, dealing high damage on touch. *The King will only cast the spell on himself and chooses a random target for the attack. ~~~~~~~~~~~~~~~~~~~~~~~~~~~~~~~~~~~~~~~~~~~~~~~~~~~~~~~~~~~~~~~~~~~~~~~~~~~~~~~~~~~ King Moggle Mog XII The King is able to use all of the above abilities, unlocking them whenever the respective moogle is killed, and all moogles except the King and the Gladiator may "Call for help", requesting an attack or heal. Spawn Order, Marking, & Suggested Kill OrderSpawn Order/Marking*:
i. Whiskerwall Kupdi Koop (4) ii. Pukla Puki the Pomburner (1) iii. Woolywart Kupqu Kogi (5) iv. Furryfoot Kupli Kipp (2) v. Pukna Pako the Tailturner (6) vi. Ruffletuft Kupta Kapa (7) vii. Puksi Piko the Shaggysong (3) Kill Order: 1. Pukla Puki the Pomburner 2. Furryfoot Kupli Kipp 3. Puksi Piko the Shaggysong 4. Whiskerwall Kupdi Koop 5. Woolywart Kupqu Kogi 6. Pukna Pako the Tailturner 7. Ruffletuft Kupta Kapa 8. King Moggle Mog XII Manor JesterThe first boss of the dungeon is the Manor Jester, and while he may not look that intimidating, if your group's DPS is too low, this can prove to be a challenging fight. The fight begins with two Manor Butlers, who initially die quite easily. Periodically, more adds will spawn throughout the fight, and they will become stronger and slightly harder to kill as the fight progresses. The Manor Jester will also cast gates on the ground, characterized by two purple circles with purple crystals surrounding it. This gate will resurrect any of the Manor Butlers that have died during the fight if they have died within the environs of the gate. This can lead to a large amount of adds present during the fight, as adds will continue to spawn. If your DPS is high enough, the Manor Steward may never make an appearance. If it is not, then a Manor Steward WILL appear and promptly be quite annoying and deal a fair amount of damage to everyone. The key to finishing the fight is either very high DPS or managing where the adds die. For anyone familiar with the Netharion WoW fight during Cataclysm, it is similar to the bone warrior adds. If you can keep your adds under control and maintain steady DPS, this fight should be no problem. AshComing soon HalicarnassusComing soon
|
KS ProxySome boss fights, some interesting things I found while playing FFXIV: ARR Image: https://goo.gl/RuCzoG
Archives
July 2017
Categories
All
|
 RSS Feed
